ubuntu armhf 编译环境及流程
我们使用的是ubuntu20.04 armhf版本 apt源已经换成了国内的
Ubuntu环境准备
首先我们需要准备Ubuntu20.04 桌面版。然后安装编译sdk的依赖库
# 更新源
$ sudo apt-get update
$ sudo apt-get upgrade

# 安装编译依赖库
$ sudo apt-get install build-essential subversion git-core libncurses5-dev zlib1g-dev gawk -y
$ sudo apt-get install flex quilt libssl-dev xsltproc libxml-parser-perl mercurial bzr -y
$ sudo apt-get install ecj cvs unzip lib32z1 lib32z1-dev -y
$ sudo apt-get install lib32stdc++6 libstdc++6 libmpc-dev libgmp-dev texinfo -y
$ sudo apt-get install autogen automake autoconf libsocketcan-dev -y
$ sudo apt-get install bison -y
$ sudo apt install python-is-python3 -y
Tina Linux介绍
Tina Linux是全志科技基于Linux内核开发的针对智能硬件类产品的嵌入式软件系统。
Tina Linux中包含Linux系统开发用到的boot 源码、内核源码、驱动、工具、系统中间件与应用程序包。可以方便的定制、编译、打包生成Linux固件镜像。
Tina Linux可以支持构建openWrt和buildroot不同构建系统;也支持单独编译BSP(Board Support Package,板级支持包);能够打包生成固件包,烧录到相应设备中并运行。
SDK软件包的准备
从百度网盘下载源码压缩包,并解压
# 解压Tina SDK,xxx为版本号
$ tar -xzvf zqboard-t113-tina-buildrootxxxxxxxxxx.tar.gz
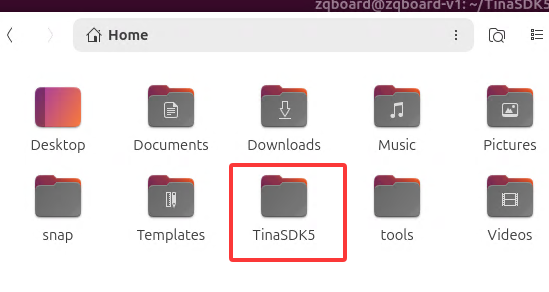
解压后,会在当前目录下多出来一个TinaSDK5目录,这个就是源码目录了。
解压完成后的完整目录如下:
编译
首先cd到源码根目录
# 如果是在用户根目录下,则执行
cd ~/TinaSDK5
source 一下环境变量
# source 环境变量
source build/envsetup.sh
然后如果是第一次运行,就先彻底清理一下
./build.sh distclean
然后载入板子的配置
./build.sh config
然后按照下图选择选项

然后就可以看到配置完成,注意检查中间有没有报错的地方

注意:ubuntu系统实际上是替换了本应该打包的buildroot文件系统,所以再这里对buildroot系统本身的任何配置,尤其是包的配置都是无效的。要修改Ubuntu系统,请参考文章后面的方法。
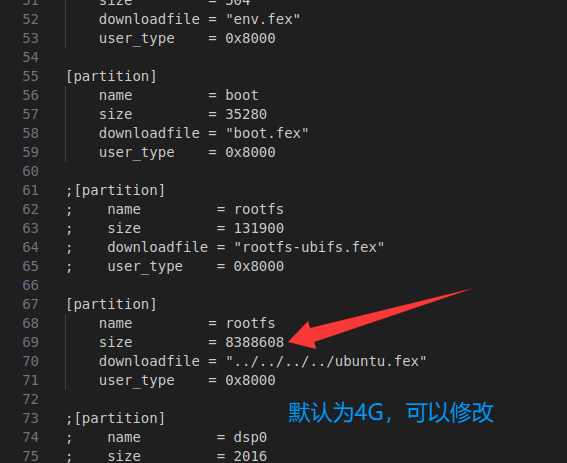
修改系统分区大小,根据sd卡的剩余空间,可以调大系统分区大小 文件路径为
/home/zqboard/TinaSDK5/device/config/chips/t113/configs/zqboard_ubuntu_sdcard/buildroot/sys_partition.fex
调整rootfs分区大小,大小为扇区,每个扇区512字节。比如要调整为8G大小,计算方法为
8*1024*1024*1024/512=16777216
在LinuxSDK根目录下执行如下命令,一键编译。
./build.sh
编译完成后,输入如下

执行如下命令,打包生成Linux系统镜像文件。将新生成的系统镜像固化至核心板即可更新系统。
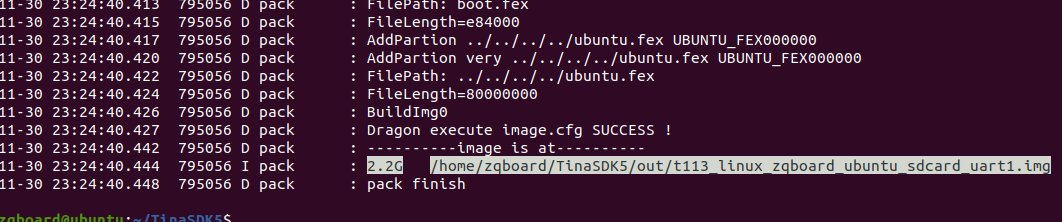
./build.sh pack
打包完成后,我们可以看到打包的文件名称和路径
默认用户名root,密码123
注意!第一次启动系统后,需要对当前root分区进行扩容,执行以下命令即可
resize2fs /dev/mmcblk0p5
/dev/mmcblk0p6是空的剩余sd卡的空间,可以自己格式化然后挂载当数据盘用
常用命令
    croot / cl                     - Changes directory to the top of the tree
    cbrandy                        - Changes directory to the brandy
    cspl / cboot0                  - Changes directory to the spl
    csbi[10|14] / copensbi[10|14]  - Changes directory to the opensbi
    cu / cuboot / cboot            - Changes directory to the uboot
    cubsp / cubootbsp / cbootbsp   - Changes directory to the uboot-bsp
    carisc                         - Changes directory to the arisc
    ck / ckernel                   - Changes directory to the kernel
    cbsp                           - Changes directory to the bsp
    cbsptest                       - Changes directory to the bsptest
    cdts                           - Changes directory to the kernel's dts
    cchip / cchips                 - Changes directory to the chip
    cbin                           - Changes directory to the chip's bin
    cboard / cconfigs / cbd        - Changes directory to the board
    crootfs                        - Changes directory to the rootfs
    cdsp                           - Changes directory to the dsp
    crtos                          - Changes directory to the rtos
    crtoshal / crtos-hal           - Changes directory to the rtos-hal
    cbuild                         - Changes directory to the build
    cbr                            - Changes directory to the buildroot
    copenssl                       - Changes directory to the product's openssl-1.0.0
    cout                           - Changes directory to the product's output
    ckout / ckernelout             - Changes directory to the kernel output
    ctarget                        - Changes directory to the target
    chostbin                       - Changes directory to the hostbin
    cplat                          - Changes directory to the platform
    ccommon                        - Changes directory to the common

Usage: build.sh [args]
    build.sh                       - default build all
    build.sh bootloader            - only build bootloader
    build.sh kernel                - only build kernel
    build.sh buildroot_rootfs      - only build buildroot
    build.sh uboot_menuconfig       - edit uboot menuconfig
    build.sh uboot_saveconfig       - save uboot menuconfig
    build.sh menuconfig            - edit kernel menuconfig
    build.sh saveconfig            - save kernel menuconfig
    build.sh recovery_menuconfig   - edit recovery menuconfig
    build.sh recovery_saveconfig   - save recovery menuconfig
    build.sh buildroot_menuconfig  - edit buildroot menuconfig
    build.sh buildroot_saveconfig  - save buildroot menuconfig
    build.sh clean                 - clean all
    build.sh distclean             - distclean all
    build.sh pack                  - pack firmware
    build.sh pack_debug            - pack firmware with debug info output to card0
    build.sh pack_secure           - pack firmware with secureboot

Usage: pack [args]
    pack                           - pack firmware
    pack -d                        - pack firmware with debug info output to card0
    pack -s                        - pack firmware with secureboot
    pack -sd                       - pack firmware with secureboot and debug info output to card0
定制ubuntu rootfs
从分区文件可以看出,rootfs实际上是源码根目录下的ubuntu.fex文件,它是一个ext4格式的文件系统镜像。我们可以通过挂载和chroot的方式来定制Ubuntu根文件系统。
1. 准备工作
首先需要安装必要的工具:
sudo apt-get install qemu-user-static binfmt-support -y
2. 挂载和修改ubuntu.fex
# 创建挂载点
sudo mkdir -p /mnt/ubuntu_rootfs

# 挂载ubuntu.fex文件
sudo mount ubuntu.fex /mnt/ubuntu_rootfs

# 复制qemu-static到目标系统(重要!用于在x86主机上运行arm程序)
sudo cp /usr/bin/qemu-arm-static /mnt/ubuntu_rootfs/usr/bin/
sudo cp /usr/bin/qemu-aarch64-static /mnt/ubuntu_rootfs/usr/bin/

# 复制DNS配置
sudo cp /etc/resolv.conf /mnt/ubuntu_rootfs/etc/resolv.conf

# 挂载必要的虚拟文件系统
sudo mount -t proc /proc /mnt/ubuntu_rootfs/proc
sudo mount -t sysfs /sys /mnt/ubuntu_rootfs/sys
sudo mount -o bind /dev /mnt/ubuntu_rootfs/dev
sudo mount -o bind /dev/pts /mnt/ubuntu_rootfs/dev/pts
3. 进入chroot环境进行定制
# 进入chroot环境
sudo chroot /mnt/ubuntu_rootfs qemu-arm-static /bin/bash
现在你已经进入了目标系统的根环境,可以执行各种定制操作:
示例:安装常用软件包
# 更新软件源
apt-get update

# 安装网络工具
apt-get install net-tools curl wget vim -y

# 安装开发工具
apt-get install gcc g++ make cmake git -y

# 安装Python相关
apt-get install python3 python3-pip -y

# 安装多媒体工具
apt-get install ffmpeg mplayer -y

# 清理缓存
apt-get clean
示例:配置系统服务
# 启用SSH服务
systemctl enable ssh

# 设置时区
ln -sf /usr/share/zoneinfo/Asia/Shanghai /etc/localtime

# 设置主机名
echo "zqboard-t113" > /etc/hostname

# 添加自定义用户
useradd -m -s /bin/bash myuser
echo "myuser:password" | chpasswd
示例:添加自定义脚本
在/etc/rc.local中添加开机自启动脚本:
#!/bin/bash
# 在系统启动时执行的定制脚本

# 启动自定义服务
/etc/init.d/mycustomservice start

exit 0
示例:安装和配置自定义应用程序
# 假设你有一个自定义应用程序
cd /opt
git clone https://github.com/yourusername/yourapp.git
cd yourapp
make
make install

# 创建systemd服务
cat > /etc/systemd/system/yourapp.service << EOF
[Unit]
Description=My Custom Application
After=network.target

[Service]
Type=simple
ExecStart=/opt/yourapp/bin/yourapp
WorkingDirectory=/opt/yourapp
Restart=always
User=root

[Install]
WantedBy=multi-user.target
EOF

systemctl enable yourapp.service
4. 退出并清理
完成所有定制后:
# 退出chroot环境
exit

# 卸载虚拟文件系统
sudo umount /mnt/ubuntu_rootfs/dev/pts
sudo umount /mnt/ubuntu_rootfs/dev
sudo umount /mnt/ubuntu_rootfs/sys
sudo umount /mnt/ubuntu_rootfs/proc

# 删除qemu-static文件
sudo rm /mnt/ubuntu_rootfs/usr/bin/qemu-*-static

# 卸载根文件系统
sudo umount /mnt/ubuntu_rootfs
5. 重新打包和烧写
定制完成后,需要重新打包系统:
# 回到SDK根目录
cd ~/TinaSDK5

# 重新打包
./build.sh pack